Wednesday, January 6, 2010

"Weird runs in the family"

My uncle is an AMAZING and SUSTAINABLE drummer, check out his youtube video, junk drum joe.

Just last week, my cousin and I drove hours to an antique store in Glens Falls, NY looking for washboards. We were so ecstatic when we found them, we actually did a jig right in the middle of the shop! Everyone thought we were crazy, which made us even happier, and then ran home, salvaged instruments in hand, and jammed all night to our favorite songs.

All sorts of household items can be used to make INCREDIBLE music. If you have your own video, share it with me! Send the link to ncolao@hunter.cuny.edu.

P.S. Yonder is the Clock, by The Felice Brother's was just announced as BBC's top "country" album of the year. While the Felice Brother's are NOT country (Americana is more suiting), I still wanted to announce their success! Congratulations to the Felice Brothers! Check out their albums, they are an EXCEPTIONAL band (and introduced me to the world of washboards and salvaged instruments).

Monday, January 4, 2010

Mmm mmm mead!

I've spent the last few weeks running around asking everyone if they had a winemaking kit that I could borrow. Many of the recipes I had found required one of these kits, along with a massive amount of supplies (one even included 12lbs of honey) and complex recipes. As someone who knows nothing about wine making, or mead making, I was feeling pretty overwhelmed. Then, I recruited my pops. He managed to find a recipe that did not require a wine kit, or even any complex materials or recipes. All you need is a quick (and cheap) stop at your local supermarket.

The supplies costed less than $30 and consisted of :

3lbs of honey (pure and unprocessed)
1 gallon of spring water
1 orange
25 raisins
1 package of Fleishman's Yeast
1 balloon
(If you don't already o
wn it, bleach for disinfection purposes)

I have read several accounts which have claimed bread yeast ruins the mixture and makes the mead taste "nasty". I was surprised when this recipe called for Fleishman's (bread) yeast, but I went along with it anyways. I am most apprehensive about this aspect of the recipe, but only time will tell who wins the yeast debate.

Here are the directions:

Sanitize everything that will come in contact with the supplies. I read that you should use no more than 1 tablespoon of bleach per 1 gallon of water. With this I washed the cutting board, knife, and safety pin (which I use to poke a hole in the balloon). I used HOT water to rinse off the oranges as well as soak the honey.


+Pour half of the water out of the jug and into a clean (sanitized) container.
+Cut the oranges into small slices and put
into the jug
+Add 25 raisins into the mixture (I don't know how arbitrary this number is, all I read was not to leave the raisins out, they're not for flavor, they are for the yeast)
+Add 3 pounds of honey
+Add 1 package of yeast


Replace the cap and shake for 5 minutes (this is the most difficult part, but also the most important, so be prepared for a nice arm workout!)

Then, remove the cap, place a hole in a balloon and stretch it over the opening of the jug. This will slowly inflate (according to the website, between 1hrs -24hrs you'll see the balloon begin to inflate, it took mine about 3 hours).
The site states that if the balloon gets too big, its time to poke another hole or two into, you don't want the balloon to explode, this will leave your mixture open to contamination. Within the first couple of days, monitor it to make sure that the gasses are escaping and the balloon isn't about to explode. I had to poke three holes into the balloon until I was satisfied I wasn't going to have a kitchen with honey spatter all over the walls.


What I have to look forward to:
After around three weeks the balloon will no longer be inflated and I can either leave the fruit in the mixture, or move the liquid to another empty jug and strain out the oranges and raisins (this will help it to clarify quicker). After a few months the mixture will loose its cloudiness, and then it's time to enjoy!

I'll check back and let everyone know what's happened after I "rack" the mead (take out the fruit and switch containers).

This recipe was taken DIRECTLY from The Joy of Mead. If you like what you've read above, I suggest that you go to this site and follow Will's directions step by step.

I have contacted Will with questions and he is prompt and informative. I suggest you do the same.
I won't know how well the recipe works for another few months. When it's time to pop bottles, I'll have a party! Viking hats, kilts, or green tights are mandatory.

Tuesday, December 22, 2009

Makey the Mead?!

So, let's start with a WOOOO finals are over!! Okay, now that's out of my system...

I've been researching how to make mead and so far it seems to be a pretty expensive project. I need to get a wine making kit just to start off, and then supplies on top of it (including 12lbs of raw honey!)...still, I am totally determined to make some delicious mead!! It seems like once I can get past the initial expense, I'll be all set!

I'm thinking one of you crazy hippies out there may already own one of these kits and will let me borrow it?? Send me an e-mail if you do and we can get started on this soon... otherwise sometime mid January seems most reasonable. I've already recruited a friend to help me (his stipulation: that he makes delicious mead while wearing a viking helmet), if you want to help too let me know (ncolao@hotmail.com)!

Until then, I'm working on an herb garden to supplement by toothpaste experiments (apparently you can make mouthwash out of fresh herbs and baking soda)... I've started with some lemon balm, but I'll hopefully get to some mints as well...

Okay, now enough talking, I gotta get to work on some of these things!

Anyone have any suggestions?


Tuesday, December 15, 2009

Ahhhh the Pressure!

I have been getting numerous text messages, emails, and straight up demanding phone calls from followers wondering why it has been a month since my last post. The answer-I'm busy! Now leave me alone!
Haha-but seriously, I am taking my first set of grad school finals and I'm determined to get nothing but A's! My last final is soon, so expect another post shortly.

Just to hold everyone over, here are some upcoming projects:

1. I am in the middle of growing some herbs (as in lemon balm, chamomile, etc.-not the other herb you little devil) and will be making my own teas, flavored oils, and even mouthwash out of them.

2. I am considering (this may be way too big a project) making mead (an alcoholic beverage made out of honey).. maybe, don't get too excited...I probably will, I mean c'mon, it's mead!!...If you would like to try my delicious mead, you'll have to wear green tights and call me your lady...giggity giggity

3. After I'm able to save some money (I'm broke, it's the holidays, give me a break) I'm going to look into getting a rain barrel...not exactly sure where I'm going to be living shortly, so I'm also looking for volunteers who will let me set up a rain barrel on their house. I already have several offers, but I still have to consider every aspect so that I can choose the optimal location, so send me a text if you want a rainbarrel.

Also, I know you all are curious, the worms are doing great! I feed them about a pound of vegetables a week and the original food that I put in the bin has already been composted. After putting up such a fight about having them in the garage, my mother now saves scraps so I can "feed the worms" and she refuses to chop up the food into small bits because she feels that, living in a bin, the worms are bored and need something to do. Typical Italian mother, she considers food a form of entertainment. Also, all newcomers to the house are required to first visit the worms...I fear she will start naming them soon.

Thanks for staying interested everyone! I can't wait to be done with finals so I can get get back to work entertaining you!! :)

Monday, November 2, 2009

Wash That Dirty Mouth!

I'm slowly replacing all of my personal hygiene products into natural and environmentally-friendly alternatives. This will take awhile as it is NOT sustainable to just throw everything out and start fresh. It's better to use what you have and replace the products as you need.

The first segment will be on oral hygiene.

I've been doing research regarding fluoride in our drinking water and toothpaste. I must say that the data on both sides of the debate are based on unsupported claims and much more research is needed for me to make an educated decision. However, I don't support the government tampering with my drinking water and adding fluoride even if there are supposed health benefits. Who are they to decide what I should or shouldn't consume or how I should take care of my own health? I'm skeptical of the FDA and went vegetarian the day the FDA decided cloned animal meat didn't need to be labeled on packaging. This being said, I am testing some alternative and all-natural dental products in lieu of the chemical-filled brands such as Colgate, Rembrandt, Crest, and even Tom's of Maine (while T.O.M is a good brand in comparison to the others, I'm still weary of some of the chemical components, like the Breyer's Ice Cream commercials, if I can't pronounce it, I don't want to eat it).

Product: IPSAB Tooth Powder
Ingredients: pure salt, baking soda, prickly ash bark, flavored with peppermint powder
Directions: The bottle just says to brush with a soft bristled toothbrush and rinse with warm water. My own experience says to wet the brush first, then pour the powder on. Some people say to dip the wet brush into the powder. To me, this seems counter intuitive, putting your bacteria filled brush into the powder is bound to contaminate it. Just wet the brush first, it works fine.
Consistency: There are no "sudsing" agents in this powder, for a newcomer as myself, this is a unsettling feeling. For some reason I relate the sudsing to cleansing even though this is not the case. Don't be afraid to add more powder.
Taste: YUCK-"pure salt" indeed, I tasted nothing other than salt. It may smell pepperminty but it sure as heck doesn't taste it. While my teeth may have been clean after using this, they didn't feel clean.
Initial Opinion: Initially, I am not thrilled with this product. The mouthwash of the same brand takes away the overwhelming feeling that I just coated my teeth with salt, but I'm not as thrilled with the ingredients. The ingredients of the powder however are all natural and preservative free, proven to remove plaque and are a healthy dental alternative. Therefore, if you are not as picky as myself, I would recommend it solely on the ingredients. I have read the reviews and many people say that "It takes a while to get used to, but then I loved it". I'll try this product for a few more days and let you know how I feel.
Overall Opinion: After using this a couple of more times, I did eventually get used to the taste. My teeth felt really smooth and my mouth felt cleansed. However, I found the salt to be too harsh and almost painful and had to follow up with a healthy dose of Chapstick every time I brushed. While I don't expect to be using this on a daily basis, I will continue to keep it in my travel bag since it doesn't count as a liquid (and the 3oz rule won't apply).

Product: Grandpa's Baking Powder Soap
Ingredients: Coconut oil, palm oil, purified water, vegetable glycerin, baking soda
Directions: Obviously, the directions on the box don't apply to you. I wet my toothbrush and rubbed it into the soap.
Consistency: Finally! That wonderful sudsy feeling that I missed so much!
Taste: Contrary to the impression you get when you hear "washing your mouth out with soap" , the glycerin was only mildly offensive and easily ignored. Honestly, it wasn't bad-there was barely any taste at all.
Initial Opinion: This is a great alternative to toothpaste with all natural ingredients and a very mild taste. Also, the bar of soap will definitely last a lot longer than a tube of toothpaste, and it is easily transportable.

Product: Make your own toothpaste
Ingredients: 3 parts baking soda : 1 part salt, mix in water or glycerine to desired texture, flavoring if wanted (make sure that with the flavor, you use something that is
edible, I've heard of people using 'essential oils' like lavender, chamomile, etc. that were meant to be burned not eaten. I don't know what happens if you do this, but common sense says go to the baking aisle and get something meant to be ingested - I got natural spearmint oil. Also, if you have an herb garden, don't waste your money on the oils, just crush some of your own herb's into the mixture).
Directions: I have separated two bags: one with baking soda and the other with salt. I put three spoonfuls of baking soda and one spoonful of salt into a small dish, and then, depending on what I feel like, I either add a Rosewater & Glycerin mixture (Heritage Brand) or some water and mint oil. I don't add much liquid, just enough to make it into a paste. Then brush for 2-4 minutes.
Consistency: You control the consistency; if you prefer powders, don't add water, glycerin, or oil, if you prefer a paste, add one or all of the above. If you add hydrogen peroxide to the mixture, you will get the 'sudsing' feeling.
Taste: Again, you control the taste with the type of oil you decide to use (or don't use). There is still a taste of salt, but not as overpowering or severe as the IPSAB powder.

Overall Opinion ( of all methods):
I will continue to use the 'make your own' method for the time being. Not only do I prefer the taste, but I have control over the ingredients in my toothpaste, which is the most comforting aspect of all. As far as conveniency, every morning I now have to make my toothpaste instead of walking half asleep into the bathroom and grabbing something ready-made (if you know me, you know I'm NOT a morning person). Yet, it takes mere minutes to make the paste and the three spoonfuls are enough to last me the whole day, so after lunch and dinner I don't have to make more. If making your own doesn't seem desirable, then I would definitely suggest the baking soda soap as an alternative. Both of these techniques are inexpensive and healthy alternatives.

Sunday, October 25, 2009

Useful Websites


I finally finished reading The Urban Homestead tonight (again, while procrastinating working on midterms...). I was going to go to bed, but it listed some AMAZING websites that I just couldn't help and check out; there would be no way I could sleep without sharing these with everyone.

First (I already sent an e-mail to my father asking him to get me one for Christmas, a joke!) is the Tumbleweed Tiny House Company:

This is a really inspiring and innovative company which makes/sells houses (and sells blueprints) for incredibly small but EXTREMELY efficient, no-space wasted, houses. The creator himself lives in a space less than 100 sq ft and it is complete with living room, kitchen, bedroom, bathroom, storage space, and outdoor porch. Most people would find living in such confined spaces claustrophobic, but even still, its worth a look!

Second: Urban Foraging. I'm a bit weary to begin this regiment on my own, but essentially you find edibles in your backyard. Ever since a woman died recently at a rest stop because she ate a rare and poisonous mushroom, I've been somewhat reserved about this. Nonetheless, after taking a class on the do's and dont's (community "walk-throughs" by educators are offered), as well as reading some of these books, I plan to pursue urban foraging myself on an extremely reserved basis. I won't be eating any mushrooms thank you.

Third: Dumpster Diving. I had a friend who always used to steal bagels out of the bakery dumpster at the end of the day because they would be able to eat free for a week afterwards. Shops tend to throw out their day-old products since they can no longer advertise them as "fresh". If you aren't inclined to eat food out of the garbage, some shops donate their day-old products to the homeless; you may want to verify that the places you are eating don't partake in this devastating waste and do something more productive with the hour-old product. If you are inclined to go dumpster diving however, check out the book:


I'm contemplating putting together a little group to go out one night and see how this goes. I have a few people in mind :)...let me know if you would be interested.

Lastly, (and I would like some input on this one) is a book by Joseph Jenkins titled, "The Humanure Handbook". I must admit, this goes WAY beyond my comfort level, and I'm inclined to call these people fundamentalists. Yet, the radical nature of this is what makes it so intriguing. As you can see in the name, humanure refers to the composting of your own excrement (it takes about year) with a 5-gallon tub fitted with a toilet seat. One person wrote that they had no place to put this "loo" so they kept in their bedroom. The title of their article, "Pooping in the Bedroom and Proud of It". Initially I was horrified, that dulled to being outrageously amused but shocked nonetheless. There is no doubt that this won't become part of the 'pop-culture goes green' rage, but I'm still curious about everyone else's reaction to this. If you have time, the book is available to download for free on:
or download the

If you could, browse through it and let me know if you think this is excessive or courageous. Personally, I'm torn between awe and disgust and way to cowardly to pursue this myself.


PS. I found some websites to help with my worms (I wasn't sure if the worms were trying to escape because they weren't happy or because a few stragglers were bad at directions). Again, the directions in The Urban Homestead are a little spotty. If you are interested in making your own bin, try the directions on:


BTW: The worms are fine :)

Friday, October 23, 2009

I got worms!

FINALLY I got worms! Crazy Aunt Mary wasn't able to make it to the baby shower and so I had to find another inexpensive way to obtain these crafty little devils. Cousin Melanie tirelessly searched the depths of the internet and found a business that actually sold and shipped worms straight to your door...what's this obscure website you ask? WORMS.COM of course!

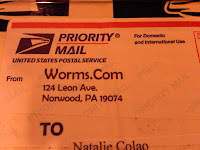
So, early yesterday morning a beautiful and eagerly awaited package arrived at my door bearing the sender
address of WORMS.COM (or call 1-800-COMPOST), my mailman must think I'm crazy.

Before I explain the process of setting up the worms in their new home, let me introduce my first obstacle of the day:worms are yucky!!

Yeah, you read correctly. I got caught up in the excitement of making a compost that is small enough to fit inside an apartment, doesn't smell, and creates compost more quickly that then the "set it and forget it" way; adding worms into the mix (literally) is able to establish all these things. This is great! So exciting! I love the idea, and as you read, I set off to make my very own vermiculture compost.

The very concept that I would be dealing with these slimy, oozy, squirmy little buggers DID NOT occur to me! EWE! Why didn't any of you warn me?
Yet, in the name of Urban Sustainability, I toughed it out. Im quite the hero...go go Captain Planet!
That's me---->


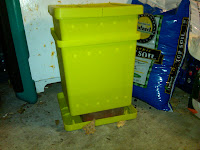
Anyways, here's how one sets up this type of compost.

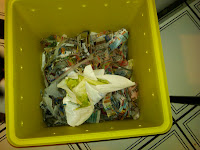
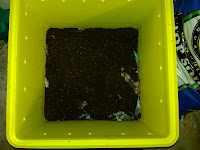
You line the bottom of the container with 4inches of wet and shredded paper. It is important that the paper is not too wet (worms drown) or too dry (they...dehydrate?). So, you have to squeeze out excess water before you place it in the container.
Then I mixed in some topsoil and buried a SMALL amount of food scraps in the bottom corner of the container. As the book that I had referenced in a previous post, The Urban Homestead explained, the worms need time to acclimate themselves into their new environment, so you don't want to overwhelm them with too much food at first.


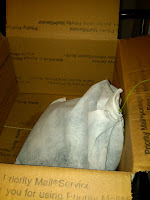
I then cut open the bag of worms that I had kept the previous day on my kitchen counter (my mother kept bugging me to get my mail off the counter, even though a big WORMS.COM was written across the top, I luckily avoided the berating I would've received had she known what was inside
my mail).

I must make a confession, while cutting open the bag, there MAY (okay, there was) have been a battle between worm and scissor...I didn't know it was there!! Sadly, the worm lost, and it's mangled body has been added to the compost; his death was not in vain...

<--Bag O' Worms

I left the worms on top of the wet, shredded paper, and they will eventually mosey their way down to the bottom of the bin and find the food that I buried.

The second bin (with holes in the bottom) also has a 4 inch layer of wet, shredded paper and will be where I put my food scraps in the future..the worms, if all goes well, will be able to travel through the holes to the food in the container above them.

The directions in The Urban Homestead are a little confusing at this point and I may have to revise this previous statement after I find some more sources to clarify some of my questions. I'll let you know happens.
worms --->

So, I have finished setting up my compost and hopefully all will go well! Yet, I have stumbled across a new and, really everyone's ultimate problem: MOM! That pain in the butt! She doesn't love my wormies like I do and she won't let me keep them in the garage where they can remain nice and warm!! The worms HATE being cold and will die, and Ms. Evil (worm) Home-Wrecker is trying to kick them out onto those hopelessly dangerous streets! I urge you all to call her and let her know how cruel she is!

I'll update to let everyone know how my worm farm is fairing as well as to post what new projects I have in store for the future. Next, I think I may be working on setting up a rain barrel but that is not definite. If anyone has any winter month ideas, let me know!

*I'd like to thank the lovely Christine and for the title of this post